How to Upgrade Nintendo Switch Memory January 6, 2018
Posted by Maniac in How To, Site Videos.add a comment
The Nintendo Switch shipped with only 32GB of internal memory, which isn’t a lot, especially if you plan to purchase most of your games through the Nintendo eShop. However, its memory can be upgraded with a UHS-I MicroSD card with a transfer speed minimum of 60MB/s.
How do you upgrade it and what can you expect when you do? For the purposes of this video we will be performing the upgrade with a 64GB MicroSDXC card. Watch and find out what happens. Make sure your Switch is updated with its most recent system software, in tablet mode, and completely turned off before performing this procedure.
How to Update Nintendo Switch Joy Con Controllers January 5, 2018
Posted by Maniac in How To, Site Videos.add a comment
My Nintendo Switch arrived with the stock internal firmware Nintendo shipped with the consoles when they launched a few months ago. As I started getting used to the new Joy Con Controllers I noticed some occasional connectivity issues when detaching them from the tablet screen and some accuracy issues with one of the thumb sticks. However, all those problems went away after I performed a controller update.
To update your Joy Con Controllers you’ll first need to update your Nintendo Switch to its most recent system software. Then you’ll need to connect both of your Joy Con Controllers to the Switch while it is in tablet mode. Finally, watch the video below to see how to find the Controller Update feature in the Switch’s settings menu.
Please post a comment below if you noticed any issues with your Joy Cons that this procedure may have fixed.
How to Transfer All Your Nintendo 3DS Data to a New 3DS January 2, 2018
Posted by Maniac in How To, Site Videos.add a comment
Not too long ago, we released a How To video to show Nintendo 3DS owners how they could upgrade the storage capacity in their handhelds without losing any of their purchases or save data. Since then, we have been swamped with requests asking if that procedure could be used to transfer their game data to a new Nintendo 3DS. It can’t, but there is another way to perform a data transfer on a 3DS
There ARE risks to performing this procedure. If performed incorrectly, it can completely wipe all the data and purchases from your original 3DS handheld. PERFORM AT YOUR OWN RISK!
Before we get started here’s a list of several things you’ll need to make this procedure work:
- A New Nintendo 3DS
- Your original 2DS, 3DS, 3DS XL, or DSi system
- A MicroSD Card with a minimum Class 4 speed and 4GB capacity. Class 10 32GB MicroSD Card Recommended
- Internet-connected WiFi Hotspot
- A Phillips Head 00 screwdriver
- A MicroSD to SD Card Adapter
- A PC or Mac with SD Card Reader
Preparation

First thing you’ll need to do is convert the storage in your original Nintendo 2DS or 3DS system to MicroSD memory, and you’ll need to buy a MicroSD card of equal to or superior storage capacity and speed to do it. If your original 3DS is already using MicroSD memory please skip this procedure and move down to the System Transfer section of the article. The original model 3DS used a 2GB Class 4 SD Card for storage. The 3DS XL used a 4GB Class 4 SD Card. Finding a MicroSD card that meets or surpasses those specifications should be simple and inexpensive, and most will come bundled with a MicroSD to SD Card adapter at no extra charge.
Completely shut off your original Nintendo 3DS using the power button. Once all the power lights turn off, turn the handheld over and open the SD Card compartment. Push the SD Card inwards to eject it out of the 3DS and slide the card out of the handheld.

Insert the SD Card you found in your original 3DS into the SD Card slot in your PC or Mac. If your computer doesn’t have an expansion slot capable of reading SD Cards, you can get a USB adapter capable of reading the cards super cheap online or at your local computer store. Once your computer verifies the card is connected, copy EVERY file and folder in the SD Card to your computer’s hard drive. This won’t take very long. Once the data is copied, safely eject the card and set it aside.
Now, take your new MicroSD Card, insert it into the included SD Card adapter, and insert the adapted MicroSD card into the exact same computer you just copied the previous card’s data to. The computer should read the MicroSD card as FAT32 formatted, and if it isn’t FAT32, you’ll need to reformat the card as FAT32 or it won’t be read by the 3DS. Delete all the data that’s currently on the new MicroSD card, and replace them with the files and folders you just copied from the old card. Do not change any file or folder names, alter the locations of any files/folders, or add any extra files or folders to the card that weren’t in the previous one.
Once all the old 3DS data copies to the new MicroSD card, safely eject it from your PC/Mac and insert it back into your original 3DS until you hear a click. Once the new card has been correctly inserted, start up your old 3DS and make sure that it launches properly. If done correctly, your old 3DS should act exactly like it had before, and all the same content you had installed before should be accessible.
System Transfer
Next up, you’ll need to perform the transfer procedure. Start up your New Nintendo 3DS system for the first time and begin its initial setup, making sure to connect it to an internet connected WiFi hotspot during the process. After that, go into the System Settings Menu from the 3DS home screen, select Other Settings, and select the system update option. Wait a few minutes while the Nintendo updates itself to match its current version. Do not create a Nintendo Network account or sign in to an existing Nintendo Network account during the setup process.
Once the New 3DS has been updated to its most recent version, go into the System Settings menu of both of your 3DS handhelds, and select the System Transfer option. If either one of the 3DS systems isn’t updated with its latest software, you’ll get an error. Otherwise, you’ll eventually see this screen:
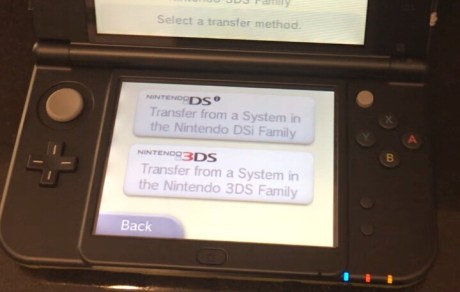
Unless you’re performing this procedure with a DSi system select the “Transfer from a System in the Nintendo 3DS Family” option on both of your handhelds. Then you’ll see this screen:

This is a very, very important screen. Failure to give it the correct information can result in total data loss on both handhelds.
On your original 3DS select the “Send from this System” option. On your New 3DS select the “Receive from Nintendo 3DS” option. If you accidentally tap the wrong button at first, do not worry as you will have to confirm your selections in the next step. Once your selections have been confirmed, we will move on.
If you have a Nintendo Network account tied into your original 3DS system, it will prompt you for your password. This is purely for security verification purposes and it will be safe to give. You’ll then confirm the 3DS you want to transfer your data to, and click through several instruction screens until we reach the next step.
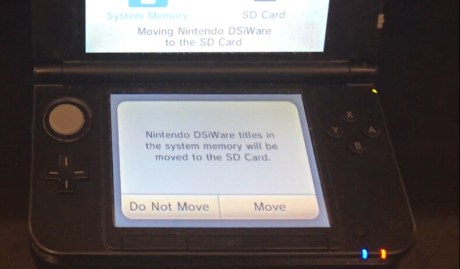
If you have any DSiWare software installed in your 3DS’s internal memory, a screen will pop up and ask you if you want to temporarily move those games onto your SD Card for the transfer. Select “Move”, as this will make it faster for you to recover those DSiWare games on your new handheld.
Once your transfer options and passwords have been confirmed, you will receive a prompt asking you how you would like the procedure to be performed.
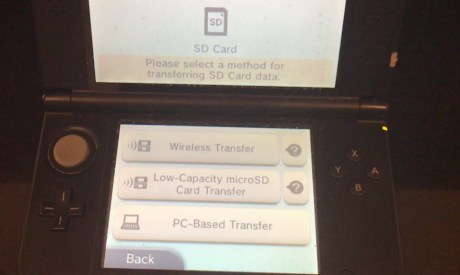
If you’ve been following this guide up to this point you’ll want to select the “PC-Based Transfer” option. This is without a doubt the fastest transfer option available and if your original 3DS already uses a MicroSD card for storage, will save you hours of transfer time. If you have a lot of free time and never changed the stock memory cards of either of your 3DS systems, select the “Wireless Transfer” option. If you do plan to do a Wireless Transfer, you might want to have a Coke handy because it can take two to four hours to complete.
After you make your transfer selection, sit back and relax as the two 3DS systems perform their transfer. Once completed, both systems will automatically restart, let them. You may notice your original 3DS system will look like it has been reset to its Day 1 factory menu, this is normal. If you chose the “PC-Based Transfer” option, you may also notice your new 3DS is prompting you to copy your old 3DS’s SD Card to its MicroSD card using your PC, and it won’t start up properly until you do. This is also normal. If you chose the “Wireless Transfer” option, your New 3DS should fully restart and be functioning as your old one did.
If you performed the “PC-Based Transfer”, turn off both handhelds fully with their power buttons (making sure both system’s power lights are fully off) and remove the memory from the SD Card slot of your original 3DS. Just push it inwards until you hear a click, and then slowly slide the card out. If you’ve properly followed this guide up until now, you should have pulled out a MicroSD card inside of an SD Card adapter. If you didn’t and the card you pulled out is a stock SD Card, you can still perform the procedure above after connecting the SD Card to your PC or Mac.
Flip your New 3DS system over and use a Philips Head size-00 micro screwdriver to loosen the two screws on top of the New 3DS rear panel. Once loosened, you can remove the back of the handheld by pulling at the open tabs on the bottom back of the handheld. This can be VERY annoying to do, as you’ll need to be firm enough to remove the panel but not too aggressive to break it. The screws don’t come out of the rear panel so don’t worry about losing them. For the life of me I cannot figure out why Nintendo forced people to do this to access the external memory on the New Nintendo 3DS when they previously had something as simple and convenient as the SD Card slot in earlier models.
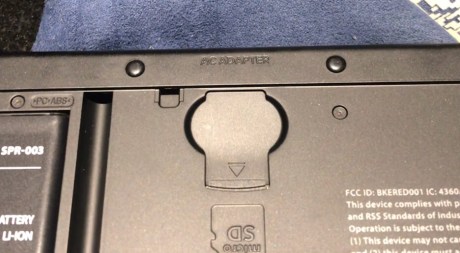
Once you have the back panel off, you should be able to access the MicroSD slot in the back of the New Nintendo 3DS. You’ll have to remove the memory that’s already in there so push the stock MicroSD card inwards until it clicks and then slide it out. Take the MicroSD card from your original 3DS out of the SD Card adapter and slide it into the New Nintendo 3DS MicroSD Card slot until you hear a click. Reattach the back of the handheld and use the screwdriver to secure it back in place.
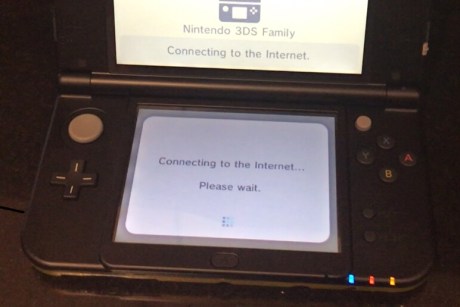
Start up your New 3DS and let it connect to the Internet. If everything went properly you could see a screen like this:
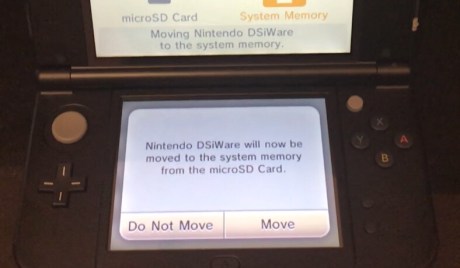
If you had DSiWare installed on your older handheld and you had previously chosen to move it to your SD Card during the transfer process, you’ll be prompted to move it into your New 3DS system’s internal memory. This is a really good sign, because if you’re seeing it, then that means the data on your old card is being read by your new system without issue. Tell it to perform the move and wait for the last of your data to transfer. If you didn’t have DSiWare content on your old 3DS your system will probably skip this step.
Once all your data has finished moving, your New 3DS will restart again and if everything goes well, your screen should appear exactly as it did on your old system, with all your software in the same place you left it! Enjoy your newer, faster 3DS system!
Hopefully this guide was able to help you through this procedure. Here’s what it was like for us to perform it!
Nintendo Switch and New Nintendo 3DS XL Samus Edition Unboxing December 30, 2017
Posted by Maniac in Site Videos.add a comment
Happy New Year, Gamers! We have been busy here during the holidays getting our essential equipment upgraded with all-new capabilities and today we will be Unboxing two major items from Nintendo, the Nintendo Switch and the Limited Samus Edition New Nintendo 3DS XL.
First up we take a look at what’s in the Switch.
Now we are going to crack open the 3DS and see what is so special about the Samus Edition.
Expect a lot more Unboxing and How-To videos to come over the next few days!
How to Update the Nintendo Switch December 28, 2017
Posted by Maniac in How To, Site Videos.add a comment
The Nintendo Switch has become one of thus Christmas’s biggest boutique gift items and a lot of new players finally have the chance to play great games like Super Mario Odyssey.
However, if your new Nintendo Switch shipped with its initial internal software, you won’t be able to make use of Nintendo’s online features during the initial setup phase. Here’s a quick video on how to update your Nintendo Switch’s system software.
For the purposes of this demonstration, the Nintendo Switch is in tablet mode, but this should work the same if the Switch is connected to a television.
Amazon Echo Show Unboxing December 25, 2017
Posted by Maniac in Site Videos.add a comment
Merry Christmas, everyone! A year ago, Maniac upgraded to Amazon’s Alexa-powered speaker, the Amazon Echo. By all intents and purposes, he loved it. A year later, he’s going to give the Echo Show, a new Alexa-powered assistant with a screen!
Before we give our thoughts about it, what do you say we take a look at what’s in the box?
Expect tons more unboxing and how-to videos in the next few days! If there’s something you’d like to see us inbox please leave a comment below!
FAIL: The Episode I Trailer Was NOT Attached to the Wing Commander Film December 19, 2017
Posted by Maniac in FAIL, Site Videos.2 comments
It’s become an urban legend over the past decade that the only reason people went to go see the 1999 film Wing Commander was because the iconic trailer for Star Wars Episode I: The Phantom Menace was attached to every copy of the film that went to theaters. The story goes that movie goers purchased their Wing Commander tickets, watched the Star Wars trailer and promptly left before the film they paid for began. It would be a great story, only it isn’t true.
Back in 1999, Maniac saw Wing Commander twice at his local movie theater. Like most theaters, his local movie house only showed trailers for awful, unwatchable films nobody was interested in before a feature film. Unless a studio attached a good trailer before a film and made them show it, his local movie theater would never air it, and when the Wing Commander film was projected onto that theater screen, the Episode I trailer never accompanied it.
Sit back and relax as Maniac sets the record straight on this urban legend, and hear his brief thoughts on the Wing Commander movie and movie trailers in general.
This is probably why Apple’s Movie Trailer website got so popular back in the early 00s, they actually offered moviegoers the chance for people to finally watch the trailers they wanted to see, something their movie theaters utterly failed to provide them. Hope you all enjoyed this FAIL, and have a happy holiday!
Tales from IT – Connecting a FireWire 800 MacBook Pro to a Thunderbolt 3 iMac December 11, 2017
Posted by Maniac in Site Videos, Tales from IT.add a comment
If you need to get your data copied off of a Mac without taking it apart, Apple built a feature into the OS X operating system called Target Disk Mode. Simply hold down the “T” Key as you turn the computer on and your Mac instantly becomes an external hard drive capable of being read by other Mac computers.
However, certain older Macs have limits on what ports can be used while in Target Disk Mode, and many of those older ports are no longer used in modern Macs like the recent iMac. The 2010 MacBook Pro, for example, can only use its 9-Pin FireWire 800 port in Target Disk Mode, and in order for another computer to connect to it in Target Disk Mode, it needs to be compatible with that port. Newer Macs no longer offer FireWire ports in their computers, and instead include newer Thunderbolt-branded ports. While faster and more capable, Apple users need to purchase an adapter to make the Thunderbolt port work with a FireWire device. Thankfully, Apple does make a FireWire To Thunderbolt adapter, its really expensive, and it doesn’t fit the new Thunderbolt 3 (USB-C) ports included in all new iMac models. You would need to get a second, even more expensive adapter, to connect a Thunderbolt 2 device to a Thunderbolt 3 port.
So it came to be that in order to perform a direct peer to peer data connection between two Macs with just seven years in age apart, Maniac would need to buy no less than one cable and two separate adapters. Maniac called every Apple Tech Support, Genius and personal friend he knew familiar with Apple products and not a single one of them (on either coast) admitted to attempting what he wanted to do, although a few admitted it would probably work on paper.
So what happens when your 2010 MacBook dies and you want to get the files off of it? Will nearly $100 worth of Apple cables do the trick? Watch and find out!
Tales From IT – Restoring Time Machine Backups to a New Mac Using Migration Assistant December 6, 2017
Posted by Maniac in Site Videos, Tales from IT.add a comment
We’ve got an all-new Tales from IT, where we follow-up on an IT story we previously talked about.
Maniac’s girlfriend had a 2010 MacBook Pro which recently died on her. Thankfully, she had kept regular Time Machine backups before the computer died, and while they didn’t include files she had made in the last two months, the vast majority of her programs and documents were safely on her time machine drive.
Mac data is not compatible with Windows PCs, so to recover her data she needed to buy a new Mac. Macs have an internal program called Migration Assistant which is designed to copy data from older Macs using three possible methods: Ethernet, Target Disk Mode, or Time Machine. The first two options were not possible, so we attempted to move all the data from her Time Machine backup.
Here’s how it worked, some tips for what not to do, and some errors you can expect if you decide to perform this procedure!
Mega Construx PokeBall Build November 18, 2017
Posted by Maniac in Site Videos.add a comment
This past weekend, Toys R Us hosted another one of their incredible in-store Pokémon events. Unlike previous events which would typically give attendees promotional cards for the Pokémon Trading Card Game, Toys R Us had a bunch of great stuff to give aspiring Pokémon Trainers, including a promotional card for the Pokémon TCG, a figurine, a custom binder, and a Mega Construx PokéBall.
Maniac assembled LEGO sets when he was a child, so seeing Mega Construx blocks appeared very familiar to him. Let’s take a closer look at the Mega Construx PokéBall, as Maniac assembles one for all of you.
Pokémon Ultra Sun and Pokémon Ultra Moon are out now exclusively on Nintendo 3DS platforms.
